How to Create PPPoE Server in Mikrotik Router
- Creating Profile Limits
4. Creating PPPoE Server
STEP 1: CREATING PPPoE IP Pool
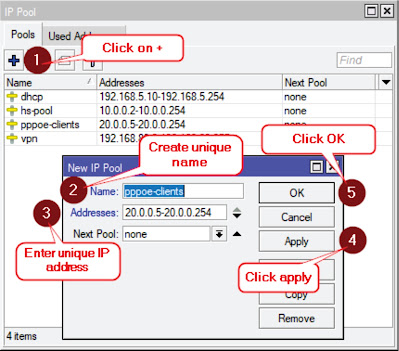
On your Mikrotik Router go to IP > Pool
1. Click + sign to add new IP Pool
2. Enter descriptive name for your new IP Pool. In this example, we are about to create an IP Pool for PPPoE Clients and so we name them pppoe-clients.
3. Enter unique IP address – in this section, we are about to create an IP block to be assigned on the individual PPPoE Clients that is connected to our PPPoE Server. Noticed that the IP address starts with 20.0.0.5 and ends with 5 and 254 which simply mean that our PPPoE server will dynamically assign a range of IP address from 20.0.0.5 - 20.0.0.254.
FREQUENTLY ASKED QUESTION
1. Do I really need to create the same IP block each time like the example below?
Answer: Yes, in terms of the format like 20.0.0.5 - 20.0.0.254 but you are free to create your own figures just follow the format.
2. Why did we start with 20.0.0.5 IP address instead of 20.0.0.0?
Answer: In this setup we prefer to start with 20.0.0.5 making 20.0.0.0 – 20.0.0.4 as a reserved IP addresses for our server use, such as PPPoE DNS and Local address. These IP addresses (20.0.0.0 – 20.0.0.4) is not being assigned to our individual clients. Hence, that you are not limited to only have 5 serve IP addresses you may increase it by incrementing the start IP from (20.0.0.10 – 20.0.0.254) and now you have 11 reserved IP address counting from 0 – 10.
3. Do I really need to create an IP Address Block starting from 20.0.0.0 or 20.0.0.5?
Answer: No, you are free to create your own IP block and not necessarily starts with 20.0.0.0 etc. You may want to have it like 30.0.0.5 – 30.0.0.254 or could be 192.168.0.5-192.168.0-254 or 50.50.5.5-50.50.5.254. Please take note that don’t make it too complicated when creating an IP block so you can easily memorize it. Like in the last example highlighted red.
STEP 2: CREATING PPPoE PROFILES
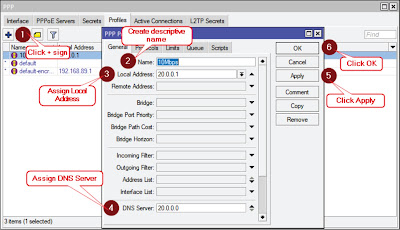
1. Click + sign to create a new PPPoe Profile
2. Create descriptive name – Please create a name which best describe the profile in the example below we entered 10Mbps which means that this profile is limited to only 10Mbps of download and upload.
If you wanted to create another profile for clients with 5Mbps speed limit you may do so. Later in this setup you will learn how to limit the speed for individual profile that you created.
3. Assign Local Address – We have mentioned lately that we have a reserved IP address from 20.0.0.0-20.0.0.4. In this setup we will use 20.0.0.1 as our server side local address mean while 20.0.0.1 will also serve as a gateway for our client router.
4. Assign DNS Server – We will assign 20.0.0.0 as our Primary DNS Server. You may also want to add a Goodle DNS as secondary DNS Server 8.8.8.8 please do so by click the arrow button sitting next to our DNS Server input field.
5. Click Apply
6. Click OK


